Sunday, January 18, 2009

Tuna Noodle Casserole

Not a high-brow recipe, but certainly a good one. I've been spending the weekend in New York with my girlfriend, who requested that I make her this old standby. It's directly from the Campbell's company itself, and like my grandma says, sometimes the best recipes are the ones from the back of the box. I change nothing from the Campbell's directions, super-easy with just a handful of ingredients.

Campbell's Kitchen Tuna Noodle Casserole

Ingredients:

2 cans (10 3/4 oz. each) Campbell's® Condensed Cream of Mushroom Soup (Regular, 98% Fat Free or 25% Less Sodium)
1 cup milk
2 cups frozen peas
2 cans (10 oz. each) tuna, drained
4 cups hot cooked medium egg noodles
2 tbsp. dry bread crumbs
1 tbsp. butter, melted

Directions:

Stir soup, milk, peas, tuna and noodles in 3-qt. casserole.
Bake at 400°F. 30 min. or until tuna mixture is hot and bubbling. Stir tuna mixture.
Stir bread crumbs and butter in small bowl. Sprinkle over tuna mixture. Bake 5 min. or until bread crumbs are browned.

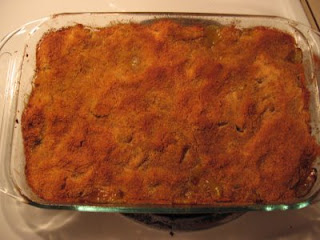
Before baking and breadcrumbs:


After baking and with breadcrumbs added:


Try Mark Bittman's new ideas for leftover noodles, also!

Saturday, January 17, 2009

Winter Squash Soup with Gruyere Croutons -- and stock from scratch!

Two nights ago I made dinner for a group of friends. I had promised a special spicy chicken soup I often make when friends are sick, known as "Rainy Day Soup," as one of the group members had not been feeling well for a few days. However, I realized after planning the meal that some of the others are vegetarians, and the plans changed.

During the past few winter months, I've been stashing away winter squash from the farmer's market. They're delicious and easy to prepare for a quick meal, stay good for weeks on end, and look lovely sitting on my countertop. I picked up a few each weekend when I went to the market, as I was scared that one day I would show up to the market, and POOF, all the squash would be gone and the season would be over.


Stockpiling squash worked out in my favor this week. I decided to make Winter Squash Soup from Smitten Kitchen, which used up my entire butternut and acorn squash stockpile. But worry not! There's still spaghetti and delicata squashes to be made, and one of my favorite farmers still have butternuts available even this far into January.


Winter Squash Soup with Gruyere Croutons


Winter Squash Soup with Gruyere Croutons
Adapted from Bon Appétit, December 1996

Soup
1/4 cup (1/2 stick) butter
1 large onion, finely chopped
4 large garlic cloves, chopped
3 14 1/2-ounce cans low-salt chicken broth
4 cups 1-inch pieces peeled butternut squash (about 1 1/2 pounds)*
4 cups 1-inch pieces peeled acorn squash (about 1 1/2 pounds)*
1 1/4 teaspoons minced fresh thyme
1 1/4 teaspoons minced fresh sage
1 1/2 teaspoons ground cumin
1/2 teaspoon ground ginger
1/8 cup whipping cream

Croutons
2 tablespoons (1/4 stick) butter
24 1/4-inch-thick baguette bread slices
1 cup grated Gruyere cheese
1 teaspoon minced fresh thyme
1 teaspoon minced fresh sage

For soup:
Melt butter in large pot over medium heat. Add onion and garlic and sauté until tender, about 10 minutes. Add broth, all squash and herbs; bring to boil. Reduce heat, cover and simmer until squash is very tender, about 20 minutes.

Working in batches, puree soup in blender. Return soup to same pot. Stir in cream and sugar; bring to simmer. Season with salt and pepper. (Can be made 1 day ahead. Chill. Rewarm over medium heat before serving.)

For croutons:
Preheat broiler. Butter 1 side of each bread slice. Arrange bread, buttered side up, on baking sheet. Broil until golden, about 1 minute. Turn over. Sprinkle cheese, then thyme and sage over. Sprinkle with salt and pepper. Broil until cheese melts, about 1 minute. Ladle soup into bowls.

Top each with croutons and serve.

Serves 8.


Notes: As Smitten Kitchen writer Deb recommends, I roasted all my squash beforehand and then scooped out the cooked squash into the soup pot, rather than have to dice and peel raw squash, which takes forever. I also used milk instead of cream, but then found the soup not to be creamy enough, so added a bit of sour cream. I also used plenty of salt and pepper -- I was worried it wasn't flavorful enough.


I also made my own stock for the very first time! I'd never done this before, but had a ton of celery and carrots in the house, along with parsley and thyme, and decided this would be the day. I used Deborah Madison's Quick Stock recipe from Vegetarian Cooking for Everyone, the best vegetarian reference guide I know. She suggests that you can add certain veggies to flavor the stock in a particular way to match the meal you're making, so I added the seeds from all the roasted squash. Yum! I felt very proud to have done this on my own.

Quick Vegetable Stock
2 teaspoons olive oil
1 onion, peeled and coarsely chopped
1 carrot, coarsely chopped
1 celery rib, coarsely chopped
2 bay leaves
4 or more garlic cloves, peeled and smashed
8 or more parsley branches
Salt

Heat oil over high heat and add the onion, carrot, and celery. Then add any other vegetables and trimmings that you are using, along with garlic and herbs. Brown vegetables over medium to medium high heat for about 10 minutes. Scrape up and incorporate any brown bits that stick to the bottom of the pan. When vegetables are browned, add 2 teaspoons salt and 2 quarts cold water. Bring to a boil, then lower the heat and simmer 30-40 minutes. Strain stock through cheese cloth lined colander.

Sunday, January 11, 2009

Lasagna

The pictures of this lasagna from Lottie and Doof are so beautiful -- the sauce is so... RED! I've never made lasagna before, or even tomato sauce from scratch, really. So I attempted this recipe for dinner tonight. Gotta get all the good stuff in before school starts again tomorrow.

I used TJ's Italian chicken sausage instead of the suggested turkey, and realized at the last minute I didn't have red pepper flakes, so put a bit of cayenne in instead.


Lasagna from Lottie + Doof
:

Ina Garten’s Turkey Lasagna (adapted)

* 2 tablespoons olive oil
* 1 cup chopped yellow onion (1 onion)
* 3 garlic cloves, minced
* 1 1/2 pounds sweet Italian turkey sausage, casings removed
* 1 (28-ounce) can crushed tomatoes in tomato puree
* 1 (6-ounce) can tomato paste
* 1/2 cup chopped fresh basil leaves
* crushed red pepper flakes, to taste (I use about half a teaspoon)
* 2 teaspoons kosher salt
* 3/4 teaspoon freshly ground black pepper
* 1/2 pound lasagna noodles
* 15 ounces ricotta cheese
* 3 to 4 ounces creamy goat cheese, crumbled
* 1 cup grated Parmesan, plus 1/3 cup for sprinkling
* 1 extra-large egg, lightly beaten
* 1 pound fresh mozzarella, thinly sliced

Preheat the oven to 400 degrees F.

Heat the olive oil in a large (10 to 12-inch) skillet. Add the onion and cook for 5 minutes over medium-low heat, until translucent. Add the garlic and cook for 1 more minute. Add the sausage and cook over medium-low heat, breaking it up with a fork, for 8 to 10 minutes, or until no longer pink. Add the tomatoes, tomato paste, the basil, red pepper flakes, 1 1/2 teaspoons of the salt, and 1/2 teaspoon pepper. Simmer, uncovered, over medium-low heat, for 15 to 20 minutes, until thickened.

Meanwhile, fill a large bowl with the hottest tap water. Add the noodles and allow them to sit in the water for 20 minutes. Drain.

In a medium bowl, combine the ricotta, goat cheese, 1 cup of Parmesan, the egg, remaining 1/2 teaspoon salt, and 1/4 teaspoon pepper. Set aside.

Ladle 1/3 of the sauce into a 9 by 12 by 2-inch rectangular baking dish, spreading the sauce over the bottom of the dish. Then add the layers as follows: half the pasta, half the mozzarella, half the ricotta, and one 1/3 of the sauce. Add the rest of the pasta, mozzarella, ricotta, and finally, sauce. Sprinkle with 1/3 cup of Parmesan. Bake for 30 minutes, until the sauce is bubbling.


This lasagna is really delicious, filling, and smells damn good while it's cooking. It also felt like an accomplishment to make the tomato sauce from scratch, and each step felt purposeful. And the lasagna will last all week!

Raspberry Breakfast Bars

When I first started looking through food blogs this week, this recipe from Lottie and Doof, and originally from a book called Baked, struck me as a particularly beautiful and delicious one.


Raspberry Breakfast Bars from Lottie and Doof

For the crust and crumb:

* 1 1/2 cups all-purpose flour
* 1 cup firmly packed dark brown sugar
* 1 1/4 cups rolled oats
* 3/4 teaspoon salt
* 3/4 teaspoon baking powder
* 1/2 teaspoon baking soda
* 1/2 teaspoon cinnamon
* 6 tablespoons unsalted butter, cut into 1-inch pieces

For the raspberry filling:

* 1/4 cup firmly packed dark brown sugar
* 1 tablespoon grated lemon zest
* 1/2 teaspoon cinnamon
* 2 tablespoons all-purpose flour
* 1 pound raspberries, fresh or frozen
* 1/4 cup fresh lemon juice
* 2 tablespoons unsalted butter, melted and cooled.

Make the crust and crumb: Preheat the oven to 350°F. Butter the bottom and sides of a 9-by-13-inch glass or light-colored metal baking pan. Put a long piece of parchment paper in the bottom of the pan, letting the parchment extend up the two short sides of the pan and overhang slightly on both ends. (This will make it easy to remove the bars from the pan after they have baked.) Butter the parchment.

Put the flour, brown sugar, oats, salt, baking powder, baking soda, and cinnamon in a food processor. Pulse in short bursts until combined. Add the butter and pulse until loose crumbs form.

Reserve 1 1/4 cup of the mixture and set aside. Pour the rest of the mixture into the prepared pan and use your hands or the back of a large wooden spoon to push the crust into an even layer at the bottom of the pan. Bake until golden brown, 15 minutes . Transfer to a wire rack and let the crust cool. Keep the oven on while you make the raspberry filling.

Make the raspberry filling: In a medium bowl, whisk the sugar, lemon zest, cinnamon and flour together. Add the raspberries, lemon juice and butter and use your hands to toss gently until the raspberries are evenly coated.

Assemble and bake the bars: Spread the raspberry filling evenly on top of the cooled crust. Sprinkle the reserved crust mixture evenly on top of the filling.


Bake for 40 to 45 minutes, rotating the pan every 15 minutes, until the top is golden brown and the filling starts to bubble around the edges.

Transfer to a wire rack to cool completely, then cut into squares and serve. The bars can be stored in the refrigerator in an airtight container for up to two days.


Notes: I used frozen raspberries from TJ's and let them defrost in a colander for a while before making the filling. Again, aluminum foil instead of parchment paper -- no problem there. I didn't feel like waiting to cool the crust (which didn't make crumbs, really), so I stuck the pan outside on the porch for a while in the 54 degree crisp January weather. When I first put the filling in the crust, I got worried that I hadn't used enough raspberries (I guesstimated about a pound at around 16 oz), and almost decided to add more, but chickened out and spread the raspberries around on the crust instead. Looked good enough to me! And proportionally, the filling to crust ration turned out great.

Overall, mine didn't come out quite as beautifully as Lottie and Doof's -- when I combined the butter with the other crust ingredients, it didn't make little crumbs. I think this has something to do with the temperature of the butter -- too warm, maybe? -- and it became more of a crumble than bars. While the bars were baking, they didn't really seem to congeal or stick together as a unit. Disappointing, because I wanted to be able to transport them easily, say, for breakfasts on the bus on the way to school, or in the morning at the hospital.

In an attempt to remedy this situation, I decided to put the bars under the broiler for a minute or two.

It was thirty seconds too long. Poor babies got burned. Even though I was standing right there watching them! Dang.


Nonetheless, the broiler was definitely what they needed to stick together a bit better. When I cut them into bars, they stayed bar-like.

Next time: broiler for only a minute. One single minute. Also, figure out the deal with the butter and crumb-making.

Despite the consistency issues, it sure tasted mighty fine.

A Sage Inspiration for a Turkey Dinner

My roommate's boyfriend recently acquired an icebox. This gloriously large new freezer space inspired him to purchase items like seven pound frozen turkey breasts. Tonight he hosted a turkey breast potluck, and my roommate and I decided to bring sage-themed items because we happened to have a bit of sage in the fridge. She made a great, meat-y stuffing with apples and mushrooms and cornbread; I made a butternut squash gratin, featuring sage, from Deborah Madison's vegetarian bible.

I ended up using one big squash instead of a few smaller ones; I was worried it wouldn't turn out sweet, because larger squash tend to be less sweet than the littler ones, but it ended up being pretty good. The potluck crew ate it up! Along with my roommate's delightful stuffing.


Butternut Squash Gratin with Onions and Sage from Deborah Madison's Vegetarian Cooking for Everyone

1/4 cup olive oil
4 cups thinly sliced onion
4 thyme sprigs
2 tablespoons chopped sage (or 2 teaspoons dried)
salt and pepper
6 cups butternut squash, cut into 1/2 inch cubes [for me this took one fairly large butternut]
1/2 cup flour
2 tablespoons chopped parsley
1/2 cup grated Gruyere or Fontina [I used gruyere]
1/2 cup plus 2 tablespoons heated whole milk
1 cup fresh bread crumbs [sadly, I used store-bought -- future project]

Preheat the oven to 350 and butter a 2-quart gratin dish.

Heat half the oil in a skillet over medium heat. Add the onion, thyme, and sage and cook, stirring frequently, until the onions are lightly caramelized, about 15 minutes. Season with 1/2 tsp salt and pepper to taste. Spread in the gratin dish.


Return the skillet to medium heat, and add the remaining oil.

Toss the squash in the flour, letting the excess fall away. Add it to the pan and cook until it begins to brown in places on both sides, about 7 minutes. Add the parsley, season with salt and plenty of pepper, and cook for one minute more. Layer the squash over the onions, cover with the cheese, then add the milk. Cover and bake for 25 minutes, then uncover, add the bread crumbs, and bake until the top is browned and the liquid absorbed, about 25 minutes more.


I had also made the Sweet and Spicy Nuts from Smitten Kitchen a few days ago, and brought a batch of those over as well. Also a bit hit.

1/3 cup dark-brown sugar
2/3 cup white granulated sugar
1 and 1/2 teaspoons kosher salt
Generous pinch of cayenne pepper
1 teaspoon ground cinnamon
1 pound walnut or pecan halves or whole peeled hazelnuts [I used pecans]
1 egg white, room temperature
1 tablespoon water

Preheat oven to 300 degrees. Mix sugars, salt, cayenne, and cinnamon, making sure there are no lumps; set aside. Beat egg white and water until frothy but not stiff. Add walnuts, and stir to coat evenly. Sprinkle nuts with sugar mixture, and toss until evenly coated. Spread sugared nuts in a single layer on a cookie sheet fitted with parchment paper. [I used aluminum foil; worked out fine.]


Bake for 30 minutes, stirring occasionally. Remove from oven, and separate nuts as they cool. When completely cool, pour the nuts into a bowl, breaking up any that stick together.

Saturday, January 10, 2009

Spontaneous grilled cheese

Sandwich! Yum! My roommate and I spontaneously made these for lunch yesterday after returning from a bountiful trip to the grocery store. Both of us tend to shop at our local food co-op, but occasionally when we need to stock up, we hit Trader Joe's. Yesterday, even more unusual, we also went to the "real" grocery store, a magical big-box land of wide aisles and non-organic staples. We came home with plenty of recipes to make for the next several days but nothing planned for lunch, so we threw together this sandwich.

Gruyere cheese, red onion, bacon, apple, and thyme. Yum. We sauteed the onion, bacon, and thyme together, and added them to pan-grilled buttered bread along with grated gruyere. The apple was a last minute addition.

Welcome!

Yesterday, while looking through some of Mark Bittman's posts on his New York Times blog Bitten, I saw a comment from the author of the blog Smitten Kitchen. I took a peek at Smitten Kitchen, and surfed around to a few others from her blogroll like Lottie and Doof, The Wednesday Chef, and Homesick Texan. These blogs are beautifully photographed, gastronomically intriguing, and mostly made me want to rush into the kitchen and serve up something good. As well as start my own food blog.

And here we are. I've started this blog as a way to catalogue my cooking adventures. I want to better plan the things I eat, remember what I make, and feel inspired to continue cooking. I want a way to keep track of the dishes I prepare and the recipes I use. I want to work my way through my always-growing pile of cookbooks, the accumulated farmer's market recipe pages, and the newly added group of food blogs. So, a toast, and cheers -- here's to seeing where this goes.