Wednesday, May 19, 2010

Banana Bread Success

This post is about how Anna is always right about most things, and especially when it comes to baking. Or, as Anna says, just trust Cook's Illustrated. After living with Anna in Brooklyn for almost a year and tasting many a delicious baked good that she whipped up, I was lucky enough to be given a copy of her secret handbook: Baking Illustrated, a cookbook published by the gastronomical science geniuses at Cook's Illustrated.

Seriously, these people know what's up -- because of science! They experiment with recipes, starting with a few different versions and then varying them to figure out just how many eggs you need , or whether sour cream, yogurt, or milk will lend the best flavor and texture. The scientific method at its best.

For example, with their banana bread recipe, they experimented with just how mashed the bananas need to be to keep the batter thick and smooth. Mashed just a bit by hand? Mashed very well? Pureed? They varied mixing the different ingredients in several ways to figure out how to create the best texture and rise in the bread. And, not only do they do all this work for you so you can make awesome food on the first try, they also tell you why it works! Food science is cool!

I chose the banana bread recipe because it's the first recipe in the book - a very good place to start, I figured. But I also have had a hankering for the chocolate chip banana bread made by Blue Sky Bakery, my favorite one in Brooklyn (they sell their baked goods at Grumpy Coffee as well as at their store on 5th Ave and Bergen in Park Slope) and wondered if the Baking Illustrated variation of Banana-Chocolate Bread could measure up.

Of course, despite starting the bread immediately after returing from the grocery store to buy a bittersweet chocolate bar, I realized as I was pouring the batter into the loaf pan that I had forgotten to follow the variation recipe and instead had made plain old banana bread. Fail! I was disappointed for a few minutes and pouted my way around the kitchen, eventually taking a little walk outside to admire the garden, but my spirits were lifted when I came back inside and smelled this delight baking in the oven.


Banana Bread from Baking Illustrated

Greasing and flouring only the bottom of a regular loaf pan causes the bread to cling to the sides and rise higher. If using a nonstick loaf pan, on which the sides are very slick, grease and flour sides as well as the bottom.

2 cups unbleached all-purpose flour
3/4 cup granulated sugar
3/4 teaspoon baking soda
1/2 teaspoon table salt
1 1/4 cups toasted walnuts , chopped coarse
3 very ripe bananas , soft, darkly speckled, mashed well (about 1 1/2 cups)
1/4 cup plain yogurt
2 large eggs , beaten lightly
6 tablespoons unsalted butter , melted and cooled
1 teaspoon vanilla extract

(As Baking Illustrated suggests, I had frozen some very ripe bananas and let them thaw on the counter a few hours before baking. They slipped right out of their skins. The fruit seemed a bit juicy, so I removed a bit of the liquid from the bowl before mashing in the other ingredients.)

Adjust oven rack to lower middle position and heat oven to 350 degrees. Grease bottom only of regular loaf pan, or grease and flour bottom and sides of nonstick 9-by-5-by-3-inch loaf pan; set aside.

Combine first five ingredients together in large bowl; set aside. Mix mashed bananas, yogurt, eggs, butter, and vanilla with wooden spoon in medium bowl.

Lightly fold banana mixture into dry ingredients with rubber spatula until just combined and batter looks thick and chunky.

Scrape batter into prepared loaf pan; bake until loaf is golden brown and toothpick inserted in center comes out clean, about 55 minutes.

Cool in pan for 5 minutes, then transfer to wire rack. Serve warm or at room temperature.


Um, yeah. This banana bread is good. Really, really good. Moist as can be, strong banana flavor, nutty without being crunchy. So tremendously good. I baked it less than 24 hours ago and there is less than a third of the bread left, after eating a hunk with Erin straight out of the oven and bringing another hunk to American Idol last night. At first I hoped I wouldn't be too sick of banana bread to try the chocolate variation in a couple of weeks; now I'm counting on folks to help me finish the remaining bit of bread as soon as possible so I can whip the chocolate version up, say, later today. Quick! Come over and eat some banana bread! And a big thanks to Anna for showing me the light of Cook's Illustrated - I am now a paying member of their website and plan to subscribe for the magazine as soon as my Bon Appetit subscription ends. As the banana bread shows, tried and tested food science wins out over shiny photos on magazine pages.

Tuesday, May 18, 2010

Plants in the ground, plants in the ground

Looking real cool with your plants in the ground! Finally.

Our wonderful neighbors consult on the garden regularly, and as they are remodeling their house, suggested that we use their unneeded rocks to hold down the bottom of the deer netting. Perfect solution!
We also stuck some bamboo stalks into the fencing so the deer could notice that there's a fence there at all. Once the stalks dry out, we'll try to make them into stakes for the tomatoes so we don't have to buy wire cages for them. There's a house in a neighborhood nearby that has their entire garden structured with bamboo - the external fence and all the internal stakes and structures.

The plants finally got planted last Wednesday afternoon. We made some elevated rows and watered and dug and got those plant roots right in. The plants were delighted to be in their permanent home after 10 days of hanging out inside the house and on the lawn in their plastic planter boxes. As we put each plant in its row, I wished it good luck and asked it to bring us lots of nice vegetables. Hopefully the words of encouragement help them grow up big and strong. Along with, you know, water and sun and all that.


So that we can monitor their progress, here's some "before" shots of all the veggies just after putting them in the ground.

Yellow Bell Peppers

Burpless Cucumbers

Yellow Squash

Sungold Tomatoes

Cherokee Purple Tomatoes

Better Boy Tomatoes (they refused to rotate for the photo!)

I spent a lot of time Thursday and Friday admiring the garden. After all our hard work , it looks so nice!


Also snuck in a quick trip to the Wednesday farmer's market last week to get eggs, a tomato, and some red leaf lettuce.
I said hi to Rob from Whitted Bowers Farm, who was almost sold out of zucchini and gave me the last few he had. He said it's hard to sell the last bit of something. He's so nice! We went out to his beautiful farm on Thursday morning to pick strawberries, which I forgot to photograph, but I assure you that they are the loveliest and most tasty strawberries around.

Tuesday, May 11, 2010

Celebrating Mother's Day with Falafel Burgers

On Sunday evening, a gaggle of friends came over to celebrate Jay's first Mother's Day -- she's due in the fall, but we like to get things started early when it comes to babies. We ate straight from the Moosewood Restaurant New Classics cookbook again. I hope to make every recipe in this book over time. This week: Falafel Burgers with Lemon Tahini Dressing, and a very modified Three Peppers Cabbage Slaw.

Falafel Burgers

1 cup diced onion
2-3 garlic cloves, minced or pressed
1 Tbsp olive oil
1 cup diced red bell peppers
1 tsp turmeric
1 tsp ground coriander
pinch of cayenne, or to taste
12 oz firm tofu, pressed and crumbled
1.5 cups cooked chick peas (15-oz can, drained)
3 Tbsp fresh lemon juice
1 Tbsp soy sauce
1 tsp dark sesame oil
1/4 cup chopped fresh parsley
1/2 tsp salt, or to taste
1/2 cup breadcrumbs

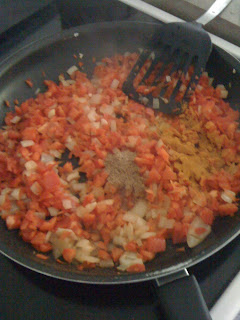
Preheat the oven to 350. Oil a baking sheet. Sauté onions and garlic in olive oil on medium heat for 5 minutes. Add peppers, turmeric, coriander and cayenne and sauté for 5 minutes more.


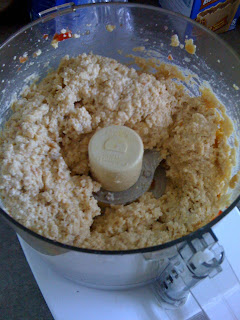
While the veggies cook, combine tofu, chick peas, lemon juice, soy sauce and sesame oil in food processor until well combined but not a paste.


Transfer tofu mixture to a large bowl. Stir in veggie mixture, parsley, tahini, bread crumbs and salt, until uniform.


Shape into 8 patties, using about 1/2 cup mixture per patty.


Bake for 30 minutes until golden, juicy and firm. Top with Yogurt Tahini Dressing.


Yogurt Tahini Dressing

1 cup plain yogurt
2 Tbsp tahini
1-2 garlic cloves, minced or pressed
1 Tbsp lemon juice
2 tsp chopped fresh dill
salt and pepper to taste

Combine all ingredients and let sit for 15 minutes before serving. Serve cold.


Three Peppers Cabbage Slaw

Salad:
4 cups finely shredded green cabbage
1/2 cup red bell pepper, cut into 1 inch matchsticks
1/2 cup green bell pepper, cut into 1 inch matchsticks
1/2 cup yellow bell pepper, cut into 1 inch matchsticks
1/2 cup finely sliced scallions
3 tablespoons chopped fresh parsley
1 seeded and minced jalapeno pepper (optional - I skipped it)

Dressing:
2 teaspoons freshly grated lemon peel
2 tablespoons fresh lemon juice
1 garlic clove, minced or pressed
2 to 3 tablespoons vegetable oil
2 tablespoons white balsamic or cider vinegar
1 teaspoon sugar
1/2 teaspoon salt

Place the salad ingredients in a serving bowl. In another bowl, whisk together all of the dressing ingredients. Pour the dressing on the vegetables and toss thoroughly. Add more vinegar, salt, or sugar to taste. Serve immediately or refrigerate for up to 3 days.


This dinner came out splendidly. The burgers are pretty easy to prepare and were a big hit. If you used soy yogurt in the dressing, it would have been a vegan meal as well, which is handy to have in your back pocket. The dressing and burgers taste great together, and all of it kept well for lunch leftovers the next day. I left out all the peppers for the slaw -- red and yellows are terribly expensive, and green just taste like crap. Instead I grated up some carrot for color, and the dressing still worked out just fine. The food was light but filling, and enjoyable to eat outside in the backyard.


The ulterior motive to inviting all these friends for dinner was to get help finally installing the posts and fencing for the garden. After much holding of ladders, banging on posts with the side of a pickaxe, twist-tying, and hilarity, the fence was finally installed! One step closer to getting those plants in the ground.

The next problem-solving issue is how to secure the fence to the ground between the posts so critters don't crawl underneath. After that is figured out, the plants should be safe and ready to move to their new home.

Saturday, May 8, 2010

Curried Lentil Dip for Erin's 30th

Last night we celebrated Erin's 30th birthday at the new house. We grilled veggie burgers and hot dogs, drank beer, sat in the breezy backyard and mingled with the folks at the kegger next door. I finally got the chance to make this dip from perhaps my favorite cookbook of all time, Moosewood Restaurant New Classics. I've been intrigued by the ingredient list, as well as the headnote for the recipe:

Looking for something unusual for a party or a potluck dinner? When this dip is one of the choices, it’s almost always gone long before the cheese dips are even half eaten.

How can I resist that? And it proved true! People really enjoyed the dip, and were into the exotic, not-quite-hummus flavor.

Curried Lentil Dip from Moosewood Restaurant New Classics

Ingredients:
1 cup red lentils
2 1/2 cups water
1 tablespoon vegetable oil
1 cup diced onions
1 1/2 cups peeled, cored, and diced apples
3 garlic cloves, minced
1/4 cup raisins
1 teaspoon curry powder
1 teaspoon garam masala
1/4 cup coconut milk
2 tablespoons fresh lemon juice
1/2 teaspoon salt

In a medium saucepan, bring the lentils and water to a boil. Lower the heat and simmer until the lentils are soft and most of the water is absorbed, about 20 minutes.

Meanwhile, heat the oil in a skillet and sauté the onions, apples, and garlic with a dash of salt for about 5 minutes on medium heat. Add the raisins, curry powder, and the garam masala, if using, and continue to sauté for 10 minutes, until tender.


In a food processor or blender, pureé the cooked lentils and sautéed onion mix with the coconut milk and lemon juice.

Add the salt and adjust to taste. Serve at room temp or chilled.

Tuesday, May 4, 2010

Back in Carrboro

So, I've finally made it back to Carrboro. There's been plenty of excitement from the moment I arrived! As I pulled into the driveway on Tuesday morning last week, I had an adorable gift waiting for me on my front step.


Yes, it's a lovely poster. It made me feel very loved upon my return to town, and I now have it displayed above my oven. But most importantly, the cookie cake! Perhaps my favorite dessert -- at least the store-bought kind -- of all time.


Lucky for me, the Wednesday afternoon farmer's market started just a few weeks before I arrived, so I was able to get to my first one on only my second day back in town. I needed to stock up my new fridge of course, so I picked up a whole variety of lovely items: a bunch of lacinato kale, a quart of strawberries, three shortbread cookies from Box Turtle Bakery, a newcomer to the market a dozen eggs, a head of lettuce (I can't remember the exact variety name, but it had "Boston" in it -- it turned out to be somewhat bitter for my taste),


Later that evening, the strawberries and the shortcake turned into dessert with the help of some vanilla ice cream from Trader Joe's.


Aside from the gourmet excitement at the farmer's market, I've been keeping myself busy unpacking the house, enjoying my spacious kitchen complete with island and bar stools, and doing exciting pieces of business like getting a North Carolina driver's license and spending a few hours attempting to get the wireless internet to function. But so far, the real excitement has been taking place in the backyard.

Excitement #1: Setting Up the Compost Bin!

After being part of a community compost in Brooklyn, the idea of throwing away my food scraps is really unappealing. I love the concept of using the ends of my carrots, the scraps of my potatoes, and the stems of my leafy greens to create rich, dark soil instead of creating more trash. We decided to go with the trash can bin, as this is portable, cheap, easy to set up, and easier to "turn" than a wooden bin, the more traditional compost holder.


All it takes is a trash can with a secure lid and a drill to create some air holes in the can. I ripped up the newspaper I used to protect my breakables during the move and added them to the bottom of the can. Then the food scraps can go right in!


The trash can makes it easy to turn the compost so the "green" and "brown" elements get mixed -- just roll it around on the ground for a while. No pitchforks! No shovels! No turning at all! Just a little watering now and then to make sure the newspaper is good and damp.

Excitement #2: Purchasing Plants

One thing I've been very excited about regarding my life in Carrboro is finally starting a vegetable garden. I've never had one before, but my landlord told me that in the past there was a huge community garden in the backyard of this house, meaning that the soil is rich. Plus, all my neighbors have gardens, and it seems like the thing to do after work and on the weekends is work on your garden and help your neighbors out with theirs. Can't beat that!

On Saturday morning at the farmer's market we picked out what we wanted to plant. We had a pretty clear idea of what we wanted, but seeing the plants and talking to the farmers really helped.


We decided on yellow squash, burpless cucumbers, yellow peppers, and three varieties of tomatoes: sungolds, better boys, and cherokee purples.


They are enthusiastically awaiting their new home in the backyard! Until then, they have to sunbathe on the table in the back. Which brings us to...

Excitement #3: Setting Up the Garden

After much advice from neighbors, input from the farmers, both discouragement and support from the local garden supply store, as well as our own independent research, we decided to create a 10x10 foot plot in the ground. The first step was picking out a nice sunny spot, and we chose one adjacent to one of our neighbor's gardens, though ours is a bit smaller. Then we measured out our plot and started digging! We've got to get the grass up first, which proved a difficult task at first. We were using shovels and digging hard to get the roots out. But after several hours of work getting us about 2/3 of the way though, our neighbor with the adjacent garden came out of his house after watching us and gave us a miraculous tool that got the rest of the grass our lickety-split! It's a very sharp hoe that he used in Guatemala, and it hacks right through the thick grass roots. After using the hoe to get the roots out, our plot was done in no time!


Now, of course, we need to fortify the ground soil with nice, black potting soil and compost or manure. Buying it in bags can be pricey, so I found us a deal on the internet. Caleb, a full-time local fireman and part-time soil delivery man, dropped off an enormous truckload of fragrant (read: smelly) soil and compost right in the backyard for a pretty reasonable price.


Our elementary school age neighbors came out and watched the truck dump all this dirt out. It was pretty exciting.

Next up, we've got to get the dirt in the ground and get our veggies in the dirt! Soon the hardest parts will be done and we'll be getting closet to eating our bounty.